
A few years ago, I took the shell of a Commodore 64, added a very slim PC motherboard, a custom keyboard interface, did a spot of re cabling , had an afternoon with a Dremel and made myself a rather fun little retro PC. You can read about the details of this project over in the ‘Commodore C64 ITX PC’ category on the right hand side.
Any-ho, after I’d had my fun with it, the motherboard was reused on another project and the empty C64 shell was put away until a rainy day. Well it’s not raining today, but whilst I await delivery of that ‘Oric’ themed keyboard to I thought, as a quick keyboard fix to use on my Raspberry Pi , why not use the C64 shell again and make myself a Commodore 64 Retro Pi…thingie.
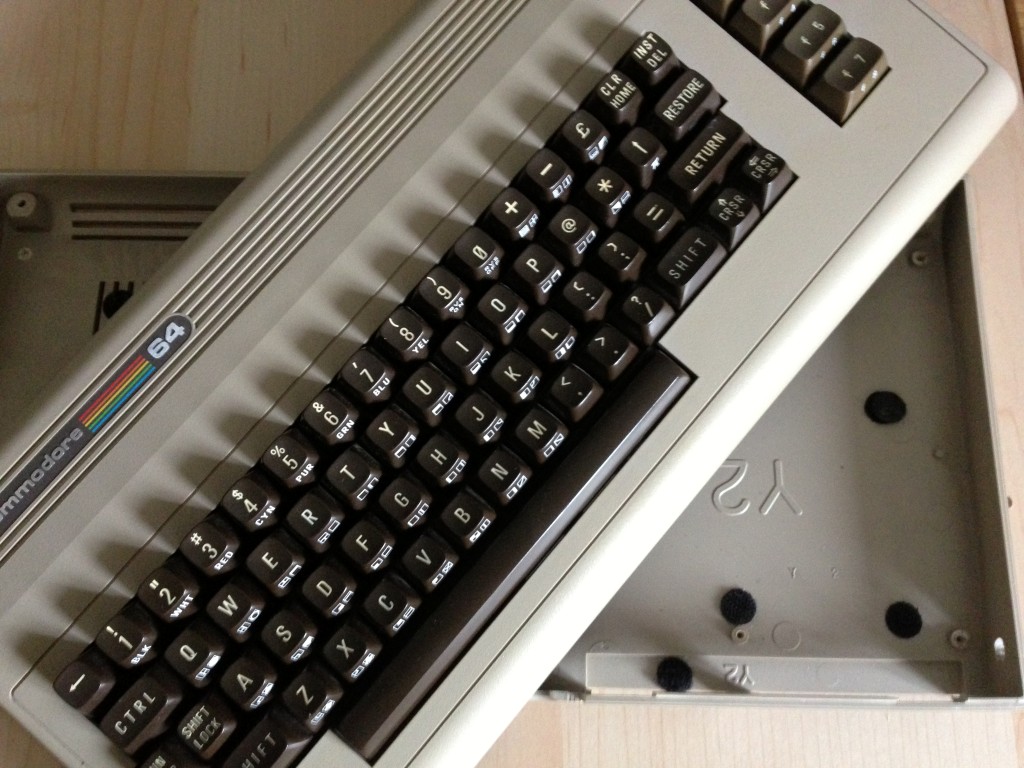
Here’s the breadbin C64 case and keyboard all ready to go.
My first job is to install the keyboard interface and for this I’ll be reusing the Keyrah board I’d previously used on my C64 PC and ‘Atar-berry’ projects. In a nutshell, the Keyrah provides a way of connecting keyboards from the Commodore 64, Vic 20, C16, Plus/4, C128, and Amiga 600 computers and converts them into a standard USB PC keyboard. The Keyrah also has two 9-pin D-Sockets so you can connect those vintage joysticks to complete the retro experience.
I’m using the discontinued V1 board, the new V2 board is multi regional and also supports Amiga 1200 keyboards – For further details and ordering information, head on over to – http://www.vesalia.de/
The Keyrah is designed to fit in the top left corner so that you can use the original port facia on the C64 (and Vic20). I’ve connected the C64 keyboard cable to the correct set of header pins and have also connected the Power LED which will function as a keymap indicator….plus, it looks cool to have it lit too!

Hehe, i remember on the C64 PC project, trying to figure out how to best position the motherboard and making various dremel cuts here and there to make it fit. No problems with the tiny dimensions of the Raspberry Pi. I could fit a whole army of them in here.
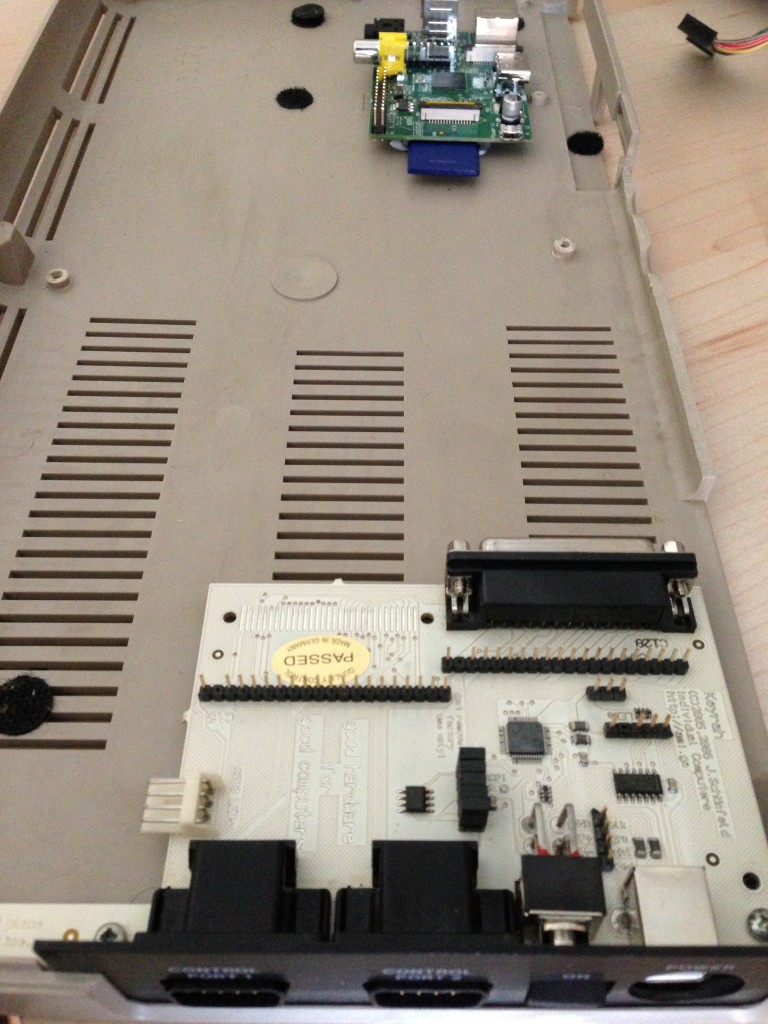
That’s about it really. All that was left to do was to hook up the usual cables to the Raspberry Pi and connect the Keyrah board to the Pi with a USB cable – you can do this either externally using a standard A to B USB cable, or for a much neater internal job, make a DIY header cable – one end (for the Pi) should be a standard USB plug and the other end (for the Keyrah) should terminate into a four pin block and attached to the header pins on the Keyrah.
For the operating system I thought I’d check out Chameleon Pi – http://chameleon.enging.com/ which not only is preconfigured with a great C64 emulator, but there’s a whole bunch of other emulators too.
I’ve downloaded the O/S image (ver 3.2), written to an SD card (via Win32DiskImager) and booting my…..hmm, what to call it>?
Commodore Pi….Raspberdore 64….RP64?

Before I start messing around with the emulators, there’s a few house keeping chores to do first, like expanding the ‘rom’ folders, setting the correct overscan for my TV and making a coffee.
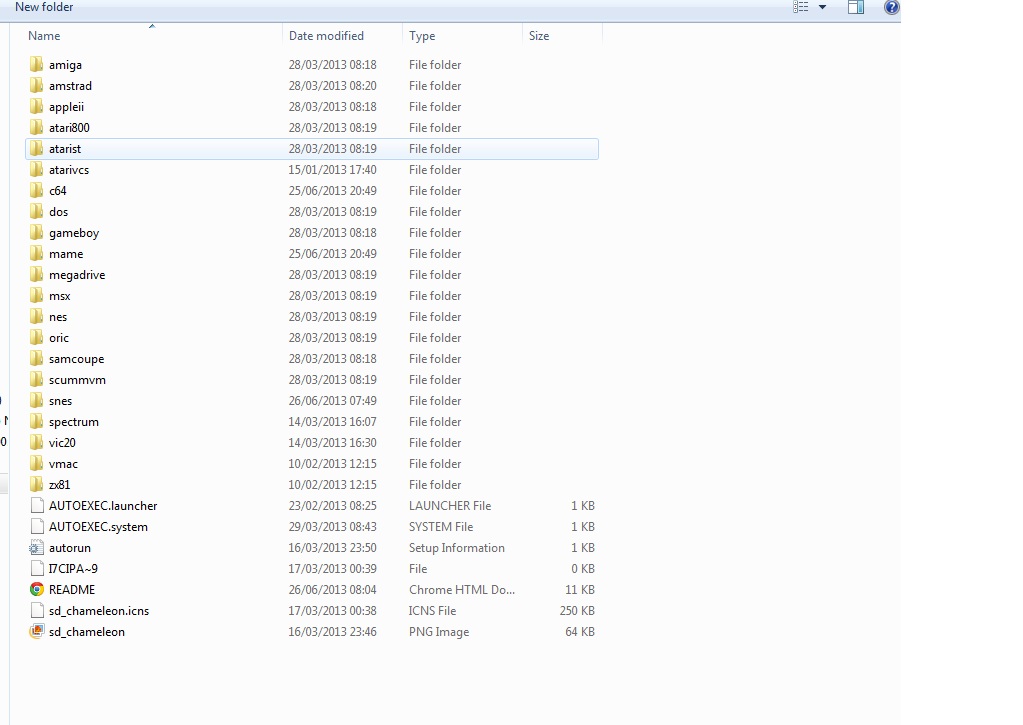
Copying game images over to the Pi has been simplified even more so with ChameleonPI. Sure, you can still do it via SSH of FTP if you want to, but for ease, just browse to the built in samba share by typing the Pi’s IP address into Windows Explorer and you get a familiar view of folders that you can drag/drop games into. Hmm, even though there’s no Amiga emulator in this particular build, it’s interesting to see that there’s a folder called Amiga. Maybe a hint of a future inclusion?
Right, lefts try one of……hehe, the default screen saver has just activated – C64 Blue screen of death 🙂

The first emulator I wanted to try was the C64 (VICE) of course, however on launching it, I couldn’t access the options menu because by default key to access these you need to press F12, which sadly isn’t supported on the Keyrah. No matter though, to reconfigure I temporary connected a standard PC keyboard, pressed F12 to access the menu and changed the emulators UI keys to something else. Once done (i remapped to F1) I reconnect the Keyrah and can now access the options.
Woo, so many options to play around with.

I found that once you got the options set the way you like them (including joystick mappings, video and sound…which incidentally, at the default 44100hz its a little distorted and much better on 22050hz) you can save these out as default.
I copied over the superb C64 game Knight & Grail and loaded on the emulator. It appears to run perfectly but you can also have the pop up status box to see what kind of FPS you’re getting.

Right, what other emulators to try…??

(Darth Vader) Noooooooooooooooooooo!


Where on earth do you find time to do all this? I’ve no idea but please keep doing it, one of the few Emails I enjoy dropping into my inbox Stiggy, always look forward to your latest projects (and feel envious a little) 😉
Hey thanks a lot buddy, made my day!
Take care
StiGGy
This is what the internet is about.
Glad you liked it.
Regards
StiGGy
Hi Stiggy nice work! As I am myself also working on similar projects (you even inspired me), I much appreciate your online postings. I promise to post the results of my projects.
Fantastic, great to hear from someone who likes playing around with stuff too. I’m sure you’ll have lots of fun, would be great to see your results.
Regards
StiGGy
Pingback: Commodore and Raspberry Pi, a perfect match | MOS 6502
Hey BanjoBanjo – it’s been some time since I’ve used iDos and and iExplorer so I’ll have to take another look for you. In the meantime, you might like to try iFunbox instead as an alternative file manager/browser because iExplorer started to have issues with IOS6.
Regards
StiGGy
Oh wait, I see you’ve already tried iFunbox.
Amazing work! You give me idea to do the same thing. But, little question from me, how did you do VICE full screen main menu? I wold like to to the same when OS boot and get startup screen with main menu in full screen mode. Regards Igor
Hey there. To be honest I can’t remember 😦 Either it’s somewhere in the video menu or I’ve edited the Vice config file….I seemed to recall reading something about having to do that.
When I get chance, I’ll fire up my Pi and have a look for you.
It your menu really small then compared to the c64 screen?
Kind regards
StiGGy
You can’t image how you idea influence on me 🙂
I wanna fire up linux distro (ubuntu or mint etc.) with autologin+start vice on boot to emulate real c64, so it’s important to have “working” vice in full screen. I see on your screenshoots “VICE mine menu” and this is what I want, to manipulate with vice only from that mode. I searched whole Internet and forums but I find nothing 🙂
In the case of size of screen, for example, double size screen is ok, but I want to do case with full screen as you do. For sure, I’ll started with project before springtime, and I Promise, I’ll inform you if I do something.
Thanx for you reply. Regards Igor
Hi, I did the same Project in an old C16 Case.
First I tried Raspian OS and its working fine.
Then I chameleon and the Keyboard doesn’t work.
When I disconnect the Keyboard from the Pi and reconnect, it works fine.
My problem is, the USB-connection is inside the case (like in your project too).
Do you have any idea how to fix it? how can I update this Linux distribution, maybe this solves the problem?
Best regards
Jens
Hey Jens that’s rather odd. I’m sure there’s an update path but I simply wipe the SD card and install a fresh copy if the latest distribution. What version if Chameleon did you try?
Regards
StiGGy
” I could fit a whole army of them in here.”
Do! It! You know you want to!
I’m not much of hardware hacker, or I’d really want to do this. C64 cluster…
Soooo tempting!
I tried version 0.32
Hi. I own a Keyrah v2 and a Raspberry Pi B+, do you think it would be possible to take the external USB input of the keyrah interface and use it to power the Raspberry Pi ?
Basically, I’d like to use a single USB power source to power both the keyrah interface and the raspberry Pi.
Thank you and best regards
Hi. I’m not sure if I follow. Usually, you’d power the Pi and simply plug in the keyrah which would draw power from the Pi.
Regards
StiGGy
Oh i see, v2 doesn’t have the internal USB header. Personally I don’t think you’ll be able to supply enough from the external header to power the Pi.
Thank you very much